Moving in VR with Machine Learning
Last time we created an ESP32 controller to move in VR.
But I wanted to try something different… This time, with machine learning, which I’ve never used before.
My goal was to gather data from myself in an idle state and also moving. I’ve changed some of the previous code and created a new repo to contain the changes that I’ve made (if you’re interested).
Previous post: https://petersen-projects.com/?p=30
Repo to the code: https://github.com/petersen-projects/openvr-walker-machine-learning
My video explaining the project (in portuguese):
So let’s get to it!
Architecture
For this example, the achitecture is as follows (same as before):
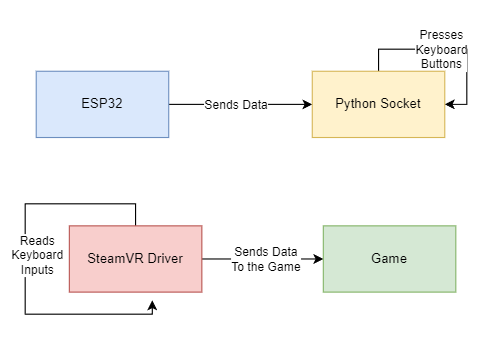
So our program works as follows:
- ESP32 reads data from the MPU6050 and sends it via socket to our python server;
- Python Server checks to see if I’m moving using Machine Learning, and based on that, presses keyboard buttons accordingly;
- SteamVR Driver checks to see if any keyboard presses were made and sends the actions to the game.
Step One – ESP32 Sending Data
I’ve changed my arduino code, now it only sends the data from the board to the server, via socket. I’m reading all of the outputs – Accelerometer X, Y and Z and Gyro X, Y and Z.
All of this gathered data is sent to the server for persisting in a csv type file. I’ve gathered this data in two ways – idle and moving.
void loop() {
  if (client.connected()) {
    sensors_event_t a, g, temp;
    mpu.getEvent(&a, &g, &temp);

    HTTPClient http;
    String currAccelX = String(a.acceleration.x);
    String currAccelY = String(a.acceleration.y);
    String currAccelZ = String(a.acceleration.z);
    String currGyroX= String(g.gyro.x);
    String currGyroY= String(g.gyro.y);
    String currGyroZ= String(g.gyro.z);
    String result = String(currAccelX + "," + currAccelY + "," + currAccelZ + "," + currGyroX + "," + currGyroY + "," + currGyroZ);
    Serial.println(result);
    client.print(result);
  } else {
    client.stop();
    connectSocket();
  }
  Serial.println("----");
  delay(read_delay);
}
As you can see, the code above is super simple and only gathers all of the info obtained from the MPU-6050 board and sends it directly to our python server.
Step two – Python for Gathering Data
First of all we have to gather some data. How can we do that?
On the esp32 side no code changes need to be made. The main goal of this device now is only to send data, nothing more.
Python now has 3 scripts which we can call (gather data, create our model and the esp32 controller).
If you check the code that it’s in my repo, you can see that there’s a file called gather_data.py. This file can be run directly from python3 and will persist all of the data that the board sends to us.
# For gathering data - set current state.
current_state = IDLE
On the code above, you must set the type of input that we are recording in this session – IDLE or MOVING. I’ve put also 5 seconds of wait time just to get things ready and start moving, so the data will be as correct as possible.
The gather_data script will generate a csv file with the chosen name for the session, I’ve chosen gathering_idle.csv and gathering_moving.csv, respectively. Both files merged into one, called consolidated_data.csv, which contains the data to train our model.
Step Three – Training our Model
Now that we’ve gathered all of our data, it’s time to create our model and persist it.
For this goal, I’ve created a script called create_model.py, which reads our consolidated_data.csv and fits it into a model. I’m using ExtraTreesClassifier (https://scikit-learn.org/stable/modules/generated/sklearn.ensemble.ExtraTreesClassifier.html) algorithm.
After running this script, a new model will be persisted inside the models folder, with the name of your choice. Mine is train-data.
The accuracy that I got was of 0.99, which is way more than I’ve hoped for.
Step Four – Changes to the OpenVR Driver
I’ve refactored a little bit of the previous code, just to keep it a little bit cleaner. The way it works is the same as before, but I’ll show you what I’ve done:
void ControllerDriver::RunFrame()
{
	float currMovSpeed = GetCurrentSpeed();
	// Update Y Axis according to the keyboard pressed buttons.
	UpdateYAxis(joystickYHandle, trackpadYHandle, currMovSpeed);
	// Update X Axis according to the keyboard pressed buttons.
	UpdateXAxis(joystickXHandle, trackpadXHandle, currMovSpeed);
}
I’ve simplified the RunFrame function and broke it into different functions. I think there’s a lots of room to improve the code, but I’m happy the way it is for now (it works :B).
Step Four – Using the Controller
After gathering the data and creating our model, it’s time to use our controller. But does it work?
Yes! In my video you can see a little bit of the device working. The results were even better than the last time, when I’ve used only a threshold. Almost no false positives and the gaming section went smoothly. Overall, I’m very pleased with the results. I’ll definitely use this device to move in my VR games from now on.
Super Ultra Advanced Gear
How do I supply energy to the device? How do I strap it in my body?

I use the super fancy equipment shown in the photo above. A super simple running belt to put the device in, an old Raspberry Pi 2 box to keep the hardware from moving while I use it and a power bank. Hey, don’t judge, it works fine :B
Softwares that track movement
I recommend doing this project for fun, but you can also find some options that achieve the same without any work:
https://store.steampowered.com/app/798810/Natural_Locomotion/
https://store.steampowered.com/app/1143750/VRocker/
https://store.steampowered.com/app/1366950/Driver4VR/
Super interesting projects, I recommend checking them out!
Whats In for the Future
I’ve seen body recognition done with a webcam, which is something that I’m interested in thinkering with.
Probably in the future I’ll try to do something with that as well. As for now, I’m gonna play a lot and enjoy the rest of my vacations (yeah, I can’t stop coding even when I’m supposed to rest :O)
That’s it! See ya next time!!
Leave a Reply